 The limited number (4) of GPIO pins on the ESP8266-01 may seem like an obstacle, for any serious application.
Yet if one uses the pins in a smart way it is very well possible to do a lot with only those 4 pins.
In some of my recent postings, I have shown the use of a DHT11 a DS18B20, an OLED, an RTC and a BMP180 with the ESP8266-01.
In this posting I set out to use 4 sensors and a display, while also uploading the acquired data to Thingspeak. It actually is expanding on a project of monitoring the atmosphere in and around my chicken coop. Yes, you could call this a weatherstation, but it is just to illustrate the use of the 4 pins, you could easily make something else this way
I will be using 2 pins for I2C (BMP180 and OLED)
1 pin for 2 DS18B20 sensors via the OneWire protocol
1 pin for the DHT11
Although the ESP8266-01 now has all its pins used, I can still add more sensors (or actuators) through the OneWire protocol and/or via the I2C protocol.
So, what do we need:
BOM
- ESP8266-01
- 2x DS18B20
- 1x DHT11
- 1x BMP180
- OLED (optional)
and ofcourse a breadboard, a 3.3 V PSU and some breadboard wires and a Thingspeak acount
Just some remarks regarding the BOM:
- ESP8266-01
Obviously the project is about utilizing the limited pins of the ESP8266-01, but if you still need to buy one, you could consider an ESP8266-12 that has more pins - DHT11
A cheap all purpose humidity and temperature sensor. It is not hugely accurate but it will do. If you still need to buy one, you could opt for the DHT22 that is supposedly more accurate, but you could also opt for the AM2321. That is a sort of DHT22 that is suitable for I2C, thus freeing another pin - BMP180
measures temperature and Airpressure. It is the successor of the BMP085, but it also now has some successors itself. There is the (cheaper) BMP280, but you could also opt for the BME280 that measures temperature, airpresure AND humidity. That way you can save on the DHT/AMS sensor - OLED
I just used that so I quickly could see whether the sensors were read, but you could just as well check it on Thingspeak. The OLED is too small anyway to print all the read values
The circuit
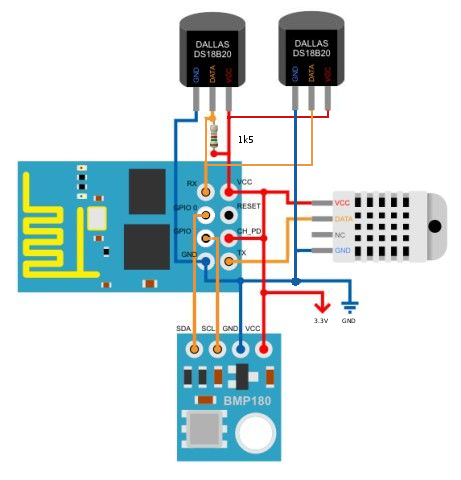 The 4 pins of the ESP8266 are not indicated as such on the PCB, and most images only clearly state GPIO0 and GPIO2.
However the ESP826-01 has a a GPIO1 pin (the Tx pin) and a GPIO3 pin (the Rx pin).
i will be using those pins as follows
- GPIO0 -> SDA pin of the I2C port
- GPIO1 ->DHT11
- GPIO2-> SCL pin of the I2C port
- GPIO3-> OneWire Bus
As my I2C modules already have pull up resistors, I will not add any I2C pullup resistors there. The DS18B20 still needs a pull up resistor for which I used a 4k7, but it is really not that critical, a 10k is also good. The DHT11 supposedly also needs a pull-up resistor but I found it to work without one as well. adding a 4k7 resistor didnt change any of the readings, so I left it out. Many of the 3 pin DHT11 modules, already have a 10 k soldered onto the module.
I just realized that I didnt draw the connections for the OLED. That is because I only hooked it up for a quick check, but should you want to add it, it is just a matter of connecting SDA to SDA and SCL to SCL… and ofcourse the ground and Vcc pins to their counterparts
The program is quite straightforward. First it sets up the libraries and the sensors.
It attaches the DHT11 to pin 1 (Tx) and the OnWire bus for the DS18B20 to pin 3 (Rx). In order to use more than 1 DS18B20 sensor on the OneWire bus, you need to know their ‘unique adress’. If you do not have that then you need a program to read those addresses. Do that on an arduino for ease.
In the program you still have to provide your WiFi credentials as well as the write API for your Thingspeak Channel
/*
   Field 1 temp roost (DHT11)
   Field 2 humidity roost (DHT11)
   field 3 Coop temperature (DS18B20)
   field 4 soil temperature (DS18B20)
   field 5 Airpressure (bmp180)
   field 6 Outside temperature (bmp180)
 * */
#include <DHT.h>
#include  <OneWire.h>//  http://www.pjrc.com/teensy/td_libs_OneWire.html
#include <DallasTemperature.h> //   http://milesburton.com/Main_Page?title=Dallas_Tem...
#include <Adafruit_BMP085.h>
#include <ESP8266WiFi.h>
#include "SSD1306.h"
SSD1306  display(0x3c, 0, 2);

#define DHTPIN 1  //GPIO1 (Tx)
#define DHTTYPE  DHT11
#define ONE_WIRE_BUS 3 // GPIO3=Rx

const char* ssid     = "YourSSID";
const char* password = "YourPassword";
const char* host = "api.thingspeak.com";
const char* writeAPIKey = "W367812985"; //use YOUR writeApi

//DHT11 stuff
float temperature_buiten;
float temperature_buiten2;
DHT dht(DHTPIN, DHTTYPE, 15);

//DS18b20 stuff
OneWire oneWire(ONE_WIRE_BUS); //oneWire instance to communicate with any OneWire devices
DallasTemperature sensors(&oneWire);// Pass address of our oneWire instance to Dallas Temperature.
DeviceAddress Probe01 = { 0x28, 0x0F, 0x2A, 0x28, 0x00, 0x00, 0x80, 0x9F};
DeviceAddress Probe02 = { 0x28, 0x10, 0xA4, 0x57, 0x04, 0x00, 0x00, 0xA9};

// bmp180 stuff
Adafruit_BMP085 bmp;

void setup() {
  //I2C stuff
  Wire.pins(0, 2);
  Wire.begin(0, 2);
  // Initialize sensors
  //dht 11 stuff
  dht.begin();
  //ds18b20 stuff
  sensors.begin();//ds18b20
  // set the resolution to 10 bit (Can be 9 to 12 bits .. lower is faster)
  sensors.setResolution(Probe01, 10);
  sensors.setResolution(Probe02, 10);
  //bmp180 stuff
  if (!bmp.begin()) {
    //   Serial.println("No BMP180 / BMP085");
    //   while (1) {}
  }

  //OLED stuff
  display.init();
  display.flipScreenVertically();
  display.setFont(ArialMT_Plain_10);
  delay(1000);

  //  Connect to WiFi network
  WiFi.begin(ssid, password);
  while (WiFi.status() != WL_CONNECTED) {
    delay(500);
  }
}

void loop() {
  //ds18b20stuff-------------------
  sensors.requestTemperatures(); // Send the command to get temperatures
  temperature_buiten = sensors.getTempC(Probe01);//
  temperature_buiten2 = sensors.getTempC(Probe02);//
  //dht11 stuff--------------------
  float humidity = dht.readHumidity();
  float temperature = dht.readTemperature();
  if (isnan(humidity) || isnan(temperature)) {
    return;
  }
  //bmp stuff-------------------------
    String t= String(bmp.readTemperature());
    String p=String(bmp.readPressure());
  //OLED stuff--------------------------
  display.clear();
  display.drawString(0,10,p);//bmp pressure
  display.drawString(0,24,String(temperature_buiten));//ds18b20
  display.drawString(0,38,String(humidity));//dht11
  display.display();

  // make TCP connections
  WiFiClient client;
  const int httpPort = 80;
  if (!client.connect(host, httpPort)) {
    return;
  }

  String url = "/update?key=";
  url += writeAPIKey;
  url += "&field1=";
  url += String(temperature);// roost (DHT1)
  url += "&field2=";
  url += String(humidity);// roost (DHT11)
  url += "&field3=";
  url += String(temperature_buiten);//coop temperature (DS18B20 nr 1)
  url += "&field4=";
  url += String(temperature_buiten2); //soil temperature (DS18B29 nr 2)
  url +="&field5=";
  url +=String(bmp.readTemperature());//Outside temperature (BMP180)
  url +="&field6=";
  url +=String(bmp.readPressure());// Airpressure (BMP180)
  url += "\r\n";

  // Send request to the server
  client.print(String("GET ") + url + " HTTP/1.1\r\n" +
               "Host: " + host + "\r\n" +
               "Connection: close\r\n\r\n");

  delay(1000);

}
Currently this program only monitors, but what is to stop you from adding a BH1750 I2C light sensor to measure if it is evening or morning or an RTC to know the time of day and to open and close the door of the coop automatically with aid of a PCF8574 I2C I/O expansion card, or as it is already in the garden, add a PCF8591 or ADS1115 AD converter to measure soil humidity and activate a pump when necessary. Or maybe switching on the water basin heater when the temperature falls below zero
if there is an I2 C chip for it, the ESP8266 can probably use it.
NOTE: the Adafruit DHT library contains an error that may show up in bigger programs on an 8266. If the majority of readings result in “failed to read”, it is time to comment out two erroneous lines in the DHT.cpp file as in the picture below:

Note: The Rx and Tx pins sometimes can be a bit unruly when used as GPIO. If you want to use them e.g. as an output, you may want to check here.

HI, this is pretty much what I’m trying to achieve but I’m a noob.
How do you upload this code to your ESP-01 ?
(at the moment I only followed a blink tutorial using arduino IDE…
I use the Arduino IDE as well. I connect to the ESP with a 3.3V USB-FTDI adapter
Thank you for the sketch. Just what I was looking for!
http://www.andrewsbrewing.com/sensors.htm
My pleasure
Hi
Very good your post, congratulations.
This code has an error.
You can send the correct code.
please.
thank you
robertocarlosalvarenga@hotmail.com
what exactly is wrong in the code? I just tried again and it compiles fine, so if I resend it, you will get exactly the same code
Good Morning THANKS FOR THE ANSWER. YOUR CODE IS VERY GOOD I WANT TO TRY. Sorry for my bad english I DO NOT WANT TO OFFEND WHEN I SAY WRONG CODE. I’M STILL LEARNING arduino.
SEE LINE 110 OF THE CODE, MISSING COMMENT; SEE THE CODE 116 LINE, HAVE A MISTAKE, WHAT IS THE CORRECT?
CAN YOU SEND SKETCH CODE TO ME? HAVE YOU TRIED TO USE PUSHBULLET IN YOUR CODE? https://www.pushbullet.com https://www.pushingbox.com
/* Field 1 temp roost (DHT11) Field 2 humidity roost (DHT11) field 3 Coop temperature (DS18B20) field 4 soil temperature (DS18B20) field 5 Airpressure (bmp180) field 6 Outside temperature (bmp180) * */ #include #include //http://www.pjrc.com/teensy/td_libs_OneWire.html #include // http://milesburton.com/Main_Page?title=Dallas_Tem… #include #include #include “SSD1306.h” SSD1306 display(0x3c, 0, 2);
#define DHTPIN 1 //GPIO1 (Tx) #define DHTTYPE DHT11 #define ONE_WIRE_BUS 3 // GPIO3=Rx
const char* ssid = “YourSSID”; const char* password = “YourPassword”; const char* host = “api.thingspeak.com”; const char* writeAPIKey = “W367812985”; //use YOUR writeApi
//DHT11 stuff float temperature_buiten; float temperature_buiten2; DHT dht(DHTPIN, DHTTYPE, 15);
//DS18b20 stuff OneWire oneWire(ONE_WIRE_BUS); //oneWire instance to communicate with any OneWire devices DallasTemperature sensors(&oneWire);// Pass address of our oneWire instance to Dallas Temperature. DeviceAddress Probe01 = { 0x28, 0x0F, 0x2A, 0x28, 0x00, 0x00, 0x80, 0x9F}; DeviceAddress Probe02 = { 0x28, 0x10, 0xA4, 0x57, 0x04, 0x00, 0x00, 0xA9};
// bmp180 stuff Adafruit_BMP085 bmp;
void setup() { //I2C stuff Wire.pins(0, 2); Wire.begin(0, 2); // Initialize sensors //dht 11 stuff dht.begin(); //ds18b20 stuff sensors.begin();//ds18b20 // set the resolution to 10 bit (Can be 9 to 12 bits .. lower is faster) sensors.setResolution(Probe01, 10); sensors.setResolution(Probe02, 10); //bmp180 stuff if (!bmp.begin()) { // Serial.println(“No BMP180 / BMP085”); // while (1) {} }
//OLED stuff display.init(); display.flipScreenVertically(); display.setFont(ArialMT_Plain_10); delay(1000);
// Connect to WiFi network WiFi.begin(ssid, password); while (WiFi.status() != WL_CONNECTED) { delay(500); } }
void loop() { //ds18b20stuff——————- sensors.requestTemperatures(); // Send the command to get temperatures temperature_buiten = sensors.getTempC(Probe01);// temperature_buiten2 = sensors.getTempC(Probe02);// //dht11 stuff——————– float humidity = dht.readHumidity(); float temperature = dht.readTemperature(); if (isnan(humidity) || isnan(temperature)) { return; } //bmp stuff————————- String t= String(bmp.readTemperature()); String p=String(bmp.readPressure()); //OLED stuff————————– display.clear(); display.drawString(0,10,p);//bmp pressure display.drawString(0,24,String(temperature_buiten));//ds18b20 display.drawString(0,38,String(humidity));//dht11 display.display();
// make TCP connections WiFiClient client; const int httpPort = 80; if (!client.connect(host, httpPort)) { return; }
String url = “/update?key=”; url += writeAPIKey; url += “&field1=”; url += String(temperature);// roost (DHT1) url += “&field2=”; url += String(humidity);// roost (DHT11) url += “&field3=”; url += String(temperature_buiten);//coop temperature (DS18B20 nr 1) url += “&field4=”; url += String(temperature_buiten2); //soil temperature (DS18B29 nr 2) url +=”&field5=”; //////ERRORR////////////////////////// url +=String(bmp.readTemperature());Outside temperature (BMP180) url +=”&field6=”; url +=String(bmp.readPressure());// Airpressure (BMP180) url += “\r\n”;
// Send request to the server ///////////////ERROR////////////////—— client.print(String(“GET url + ” HTTP/1.1\r\n” + “Host: ” + host + “\r\n” + “Connection: close\r\n\r\n”);
delay(1000);
}
Se devo orgulhar-me, que seja nas coisas que mostram a minha fraqueza.
________________________________
Good Morning
THANKS FOR THE ANSWER.
YOUR CODE IS VERY GOOD I WANT TO TRY.
Sorry for my bad english
I DO NOT WANT TO OFFEND WHEN I SAY WRONG CODE.
I’M STILL LEARNING arduino.
SEE LINE 110 OF THE CODE, MISSING COMMENT;
SEE THE CODE 116 LINE, HAVE A MISTAKE, WHAT IS THE CORRECT?
CAN YOU SEND SKETCH CODE TO ME?
HAVE YOU TRIED TO USE PUSHBULLET IN YOUR CODE?
https://www.pushbullet.com
https://www.pushingbox.com
/*
Field 1 temp roost (DHT11)
Field 2 humidity roost (DHT11)
field 3 Coop temperature (DS18B20)
field 4 soil temperature (DS18B20)
field 5 Airpressure (bmp180)
field 6 Outside temperature (bmp180)
* */
#include
#include // http://www.pjrc.com/teensy/td_libs_OneWire.html
#include // http://milesburton.com/Main_Page?title=Dallas_Tem…
#include
#include
#include “SSD1306.h”
SSD1306 display(0x3c, 0, 2);
#define DHTPIN 1 //GPIO1 (Tx)
#define DHTTYPE DHT11
#define ONE_WIRE_BUS 3 // GPIO3=Rx
const char* ssid = “YourSSID”;
const char* password = “YourPassword”;
const char* host = “api.thingspeak.com”;
const char* writeAPIKey = “W367812985”; //use YOUR writeApi
//DHT11 stuff
float temperature_buiten;
float temperature_buiten2;
DHT dht(DHTPIN, DHTTYPE, 15);
//DS18b20 stuff
OneWire oneWire(ONE_WIRE_BUS); //oneWire instance to communicate with any OneWire devices
DallasTemperature sensors(&oneWire);// Pass address of our oneWire instance to Dallas Temperature.
DeviceAddress Probe01 = { 0x28, 0x0F, 0x2A, 0x28, 0x00, 0x00, 0x80, 0x9F};
DeviceAddress Probe02 = { 0x28, 0x10, 0xA4, 0x57, 0x04, 0x00, 0x00, 0xA9};
// bmp180 stuff
Adafruit_BMP085 bmp;
void setup() {
//I2C stuff
Wire.pins(0, 2);
Wire.begin(0, 2);
// Initialize sensors
//dht 11 stuff
dht.begin();
//ds18b20 stuff
sensors.begin();//ds18b20
// set the resolution to 10 bit (Can be 9 to 12 bits .. lower is faster)
sensors.setResolution(Probe01, 10);
sensors.setResolution(Probe02, 10);
//bmp180 stuff
if (!bmp.begin()) {
// Serial.println(“No BMP180 / BMP085”);
// while (1) {}
}
//OLED stuff
display.init();
display.flipScreenVertically();
display.setFont(ArialMT_Plain_10);
delay(1000);
// Connect to WiFi network
WiFi.begin(ssid, password);
while (WiFi.status() != WL_CONNECTED) {
delay(500);
}
}
void loop() {
//ds18b20stuff——————-
sensors.requestTemperatures(); // Send the command to get temperatures
temperature_buiten = sensors.getTempC(Probe01);//
temperature_buiten2 = sensors.getTempC(Probe02);//
//dht11 stuff——————–
float humidity = dht.readHumidity();
float temperature = dht.readTemperature();
if (isnan(humidity) || isnan(temperature)) {
return;
}
//bmp stuff————————-
String t= String(bmp.readTemperature());
String p=String(bmp.readPressure());
//OLED stuff————————–
display.clear();
display.drawString(0,10,p);//bmp pressure
display.drawString(0,24,String(temperature_buiten));//ds18b20
display.drawString(0,38,String(humidity));//dht11
display.display();
// make TCP connections
WiFiClient client;
const int httpPort = 80;
if (!client.connect(host, httpPort)) {
return;
}
String url = “/update?key=”;
url += writeAPIKey;
url += “&field1=”;
url += String(temperature);// roost (DHT1)
url += “&field2=”;
url += String(humidity);// roost (DHT11)
url += “&field3=”;
url += String(temperature_buiten);//coop temperature (DS18B20 nr 1)
url += “&field4=”;
url += String(temperature_buiten2); //soil temperature (DS18B29 nr 2)
url +=”&field5=”;
//////ERRORR////////////////////////// url +=String(bmp.readTemperature());Outside temperature (BMP180)
url +=”&field6=”;
url +=String(bmp.readPressure());// Airpressure (BMP180)
url += “\r\n”;
// Send request to the server
///////////////ERROR////////////////—— client.print(String(“GET url + ” HTTP/1.1\r\n” + “Host: ” + host + “\r\n” + “Connection: close\r\n\r\n”);
delay(1000);
}
Good Morning
THANKS FOR THE ANSWER.
YOUR CODE IS VERY GOOD I WANT TO TRY.
Sorry for my bad english
I DO NOT WANT TO OFFEND WHEN I SAY WRONG CODE.
I’M STILL LEARNING arduino.
SEE LINE 110 OF THE CODE, MISSING COMMENT;
SEE THE CODE 116 LINE, HAVE A MISTAKE, WHAT IS THE CORRECT?
CAN YOU SEND SKETCH CODE TO ME?
HAVE YOU TRIED TO USE PUSHBULLET IN YOUR CODE?
//https://www.pushbullet.com
//https://www.pushingbox.com
/*
Field 1 temp roost (DHT11)
Field 2 humidity roost (DHT11)
field 3 Coop temperature (DS18B20)
field 4 soil temperature (DS18B20)
field 5 Airpressure (bmp180)
field 6 Outside temperature (bmp180)
* */
#include
//#include // http://www.pjrc.com/teensy/td_libs_OneWire.html
//#include // http://milesburton.com/Main_Page?title=Dallas_Tem…
#include
#include
#include “SSD1306.h”
SSD1306 display(0x3c, 0, 2);
#define DHTPIN 1 //GPIO1 (Tx)
#define DHTTYPE DHT11
#define ONE_WIRE_BUS 3 // GPIO3=Rx
const char* ssid = “YourSSID”;
const char* password = “YourPassword”;
const char* host = “api.thingspeak.com”;
const char* writeAPIKey = “W367812985”; //use YOUR writeApi
//DHT11 stuff
float temperature_buiten;
float temperature_buiten2;
DHT dht(DHTPIN, DHTTYPE, 15);
//DS18b20 stuff
OneWire oneWire(ONE_WIRE_BUS); //oneWire instance to communicate with any OneWire devices
DallasTemperature sensors(&oneWire);// Pass address of our oneWire instance to Dallas Temperature.
DeviceAddress Probe01 = { 0x28, 0x0F, 0x2A, 0x28, 0x00, 0x00, 0x80, 0x9F};
DeviceAddress Probe02 = { 0x28, 0x10, 0xA4, 0x57, 0x04, 0x00, 0x00, 0xA9};
// bmp180 stuff
Adafruit_BMP085 bmp;
void setup() {
//I2C stuff
Wire.pins(0, 2);
Wire.begin(0, 2);
// Initialize sensors
//dht 11 stuff
dht.begin();
//ds18b20 stuff
sensors.begin();//ds18b20
// set the resolution to 10 bit (Can be 9 to 12 bits .. lower is faster)
sensors.setResolution(Probe01, 10);
sensors.setResolution(Probe02, 10);
//bmp180 stuff
if (!bmp.begin()) {
// Serial.println(“No BMP180 / BMP085”);
// while (1) {}
}
//OLED stuff
display.init();
display.flipScreenVertically();
display.setFont(ArialMT_Plain_10);
delay(1000);
// Connect to WiFi network
WiFi.begin(ssid, password);
while (WiFi.status() != WL_CONNECTED) {
delay(500);
}
}
void loop() {
//ds18b20stuff——————-
sensors.requestTemperatures(); // Send the command to get temperatures
temperature_buiten = sensors.getTempC(Probe01);//
temperature_buiten2 = sensors.getTempC(Probe02);//
//dht11 stuff——————–
float humidity = dht.readHumidity();
float temperature = dht.readTemperature();
if (isnan(humidity) || isnan(temperature)) {
return;
}
//bmp stuff————————-
String t= String(bmp.readTemperature());
String p=String(bmp.readPressure());
//OLED stuff————————–
display.clear();
display.drawString(0,10,p);//bmp pressure
display.drawString(0,24,String(temperature_buiten));//ds18b20
display.drawString(0,38,String(humidity));//dht11
display.display();
// make TCP connections
WiFiClient client;
const int httpPort = 80;
if (!client.connect(host, httpPort)) {
return;
}
String url = “/update?key=”;
url += writeAPIKey;
url += “&field1=”;
url += String(temperature);// roost (DHT1)
url += “&field2=”;
url += String(humidity);// roost (DHT11)
url += “&field3=”;
url += String(temperature_buiten);//coop temperature (DS18B20 nr 1)
url += “&field4=”;
url += String(temperature_buiten2); //soil temperature (DS18B29 nr 2)
url +=”&field5=”;
//////ERRORR////////////////////////// url +=String(bmp.readTemperature());Outside temperature (BMP180)
url +=”&field6=”;
url +=String(bmp.readPressure());// Airpressure (BMP180)
url += “\r\n”;
// Send request to the server
///////////////ERROR////////////////—— client.print(String(“GET url + ” HTTP/1.1\r\n” + “Host: ” + host + “\r\n” + “Connection: close\r\n\r\n”);
delay(1000);
}
Good Morning
THANKS FOR THE ANSWER.
YOUR CODE IS VERY GOOD I WANT TO TRY.
Sorry for my bad english
I DO NOT WANT TO OFFEND WHEN I SAY WRONG CODE.
I’M STILL LEARNING arduino.
SEE LINE 110 OF THE CODE, MISSING COMMENT;
SEE THE CODE 116 LINE, HAVE A MISTAKE, WHAT IS THE CORRECT?
CAN YOU SEND SKETCH CODE TO ME?
HAVE YOU TRIED TO USE PUSHBULLET IN YOUR CODE?
pushbullet.com
pushingbox.com
//////ERRORR////////////////////////// url +=String(bmp.readTemperature());Outside temperature (BMP180)
///////////////ERROR////////////////—— client.print(String(“GET url + ” HTTP/1.1\r\n” + “Host: ” + host + “\r\n” +
Not offended, dont worry.

Yes line 10 needs ‘//’
but I really do not see the error in line 116. I copied the code from the page and it compiles fine. I am not sure if you put the the two dashes in front of ‘client.print’ but they are not supposed to be there.
So it really would be helpful if you tell me what error you get because I just tried and there is no error. What error do you get? What is the IDE telling you?
What would you want me to do with Pushbulet?
Hi friend, thank you very much for your post.
I was able to figure out my mistake.
Missing quotes in “GET”.
SEE PART OF THE CORRECT CODE.
// Send request to the server
client.print(String(“GET”)+url+ ” HTTP/1.1\r\n” +
“Host: ” + host + “\r\n” +
“Connection: close\r\n\r\n”);
I see 🙂 Thanks for the feedback. I guess you must have been retyping the code then as the quotes are in the published code. Retyping often causes problems like that
Anyway I am happy you found it
In the past 4 years, the ESP8266 is the most popular Wifi solution for Makers, the good spec and cheap price make the competitors, such as RTL8710, hard to grow up.
But sometimes plan B is indeed needed. Recently the W600 Arm SoC Wifi solution, released by Winner Micro, we think would be an evenly matched competitor for ESP8266.
That’s the Air602 right? I have one of those but didn’t get around doing anything with it yet. Software support still minimal and slightly more expensive than esp8266 so I don’t foresee a big jump yet