Solved: Starting programs at boot didn’t work on raspberry

Today I made a new fresh install of Raspbian-Stretch on my old RaspberryPi 1B. That board mainly has some python programs on it that MQTT info onto my network to OpenHab. The previous install had become a bit broken I think, it would crash every two days and rather than sorting that out, I decided a fresh install would be the quickest.

After installing a fresh Stretch image, I put all the programs and required libraries back on, a quick test and that all worked.
OK, now it is time to have the programs start automatically at boot.
That is also simple, I usually add the programs I want to start at boot in my /etc/rc.local file.

Always worked for me.
However, this time it didn’t and for the life of me I couldn’t figure it out. Why is a setup that used to work suddenly not working anymore, starting the programs at boot, while the programs itself work when started manually.
Trying trying trying. Writing the output from each command to a log file didn’t help me, logfiles stayed empty.
Then I decided to write the output of the entire rc.local file to a logfile with:

exec > /tmp/rc-local.out 2>&1;set -x

put that in the rc.local file right before the line that says “# Print the IP address”:

I rebooted and checked the file: /tmp/rc-local.out.

Now it became clear…. the paho (mqtt) module that these python programs were using was not found.
Odd.. I am sure I installed it……and when I manually start the programs they work 100%

I was thinking….. in my previous setup, I had installed the paho.mqtt library manually. It resided in a folder in my /home/pi directory. This time I had installed it with pip. Now it wouldn’t be that…… no, it couldn’t, could it?
The commands in the rc.local file, as far as I know are given by root and my /home/pi directory was owned by ‘pi’…….but that hadn’t changed between two installs and root has privilege anywhere right?

After some more searching I learned that the library “paho” had been installed by pip in the folder “/home/pi/.local/lib/python2.7/site-packages” but “sudo python” searches this library in the folder “/usr/local/lib/python2.7/dist-packages”.

I was not using sudo… but that is in fact what the rc.local does, so I was guessing that that was where my problem lied.

So, I needed to link the one directory to the other somehow.

This is what did that:

cd /usr/lib/python2.7/dist-packages
sudo ln -s /home/pi/.local/lib/python2.7/site-packages/paho

Then it all worked again.

Interesting info on how to start your programs at boot can be found here.
Using limitswitches with diodes

DC motors are often used in electronic projects and a special case is when a DC motor needs to be brought to a certain begin or end position without going further. Typically limit switches are then used. Such a switch is pressed by the motor when that motor reaches its end position. Similarly such a switch can be used when a motor reaches its begin position again.

Obviously, when a limit switch is pressed an action needs to be taken to stop the motor. The solution for that is in fact simple and old news, but surprisingly many hobbyists don’t know about that solution or struggle with it, and that’s why I will explain it here (with apologies to all people who do know it)

Motor in middle position

Rotating movement

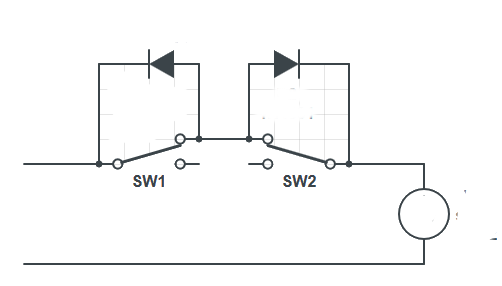
In the picture above there is a typical circuit for a motor with limit switches. Let’s presume the left switch is opened when the motor comes to its desired left position and the right one opens when the motor comes to its desired right position. Let’s also presume that the motor in that picture is in between left and right position.

It is easy to see that the electrical circuit is closed and that it doesn’t matter what polarity is used.

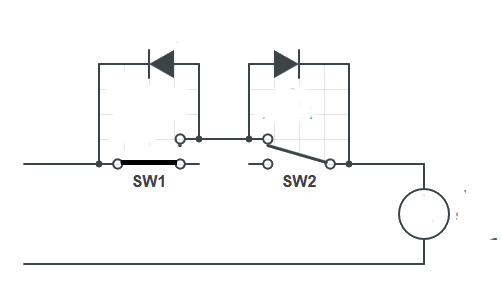
We then apply a positive voltage to the top wire and a negative voltage to the bottom wire. The motor starts turning left, until it reaches, presses and opens SW1.


Motor in leftmost position

At that moment, the electric circuit is open: Switch S1 is open and the left diode blocks a positive voltage. The motor stops.

To make the motor go back to its original position, we need to reverse polarity, so now the left most diode sees a negative voltage on its cathode and will conduct current: the motor turns reverse. After it traveled a fraction, SW1 will close again (as in the first picture)…but that only becomes relevant later. We let the motor travel reverse till it comes to its desired right position, where it opens SW2.


Motor in desired right position

As soon as SW2 is open, the circuit gets broken again, no current will flow and the motor stops. As SW1 has closed again after the motor started traveling, the circuit will now conduct for a positive voltage on the top connector. Though SW2 is open, the right-side diode will conduct.

Linear Actuators

I explained this using example of a rotating movement but of course this also can be used with linear actuators: one switch to be activated at the extended position and one at the retracted position. The diodes should be put in as follows:
Say putting the positive voltage on the top line would make the actuator go to its extended position. Then Switch SW1 should be activated (actually ‘interrupted’) in that extended position and SW2 in the retracted position.
Explanation is that when SW1 is interrupted, the entire circuit is interrupted no current will flow and the motor stops. If you then reverse the polarity 9witj negative on the top wire) SW1 will still be interrupted, but the current can flow through the diode and the motor will spin backwards. Once it has done that enough SW1 will be closed again and the current will now flow through both switches….till the actuator comes to its retracted position and interrupts SW2 and thus the circuit.

Arduino Atmega 2560 with ethernet W5500 module

If you want to connect the Arduino Atmega2560 with ethernet, there are various options. The easiest might be to get a shield. The regular Arduino shield should fit on the Arduino Mega as well. there are 3 versions of the shield: with an ENC28J60, with a W5100 and with a W5500.
The shields are fairly expensive, it is cheaper to get an ethernet module. These are also available as ENC28J60, W5100 and W5500.

With prices all in the same range (currently around 2.60 Euro), it is best to get a W5500, the most modern chip of the range, that definitely needs less memory than the ENC28J60.

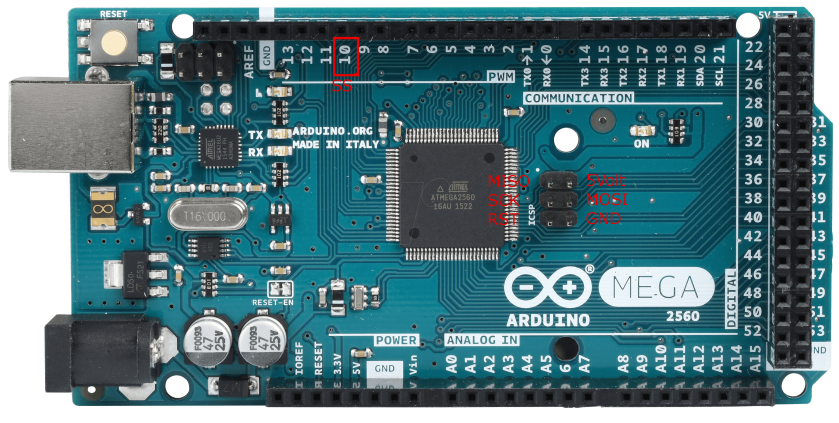
To connect it to an Arduino Mega2560, one only needs 7 connections as shown in the image below.

The SPI connections can be best taken from the ICSP connector  and the chipselect from Pin 10.
Connections on the W5500 module are equally simple as they are usually printed on the module:
SCS is the chipselect that goes to pin 10
SCLK is the clock signal that goes to SCK on the 6 pin header.

When using the W5500, the ‘old’ Ethernet library is not usable anymore. You need to use the Adafruit Ethernet2 library or the WIZ_Ethernet_Library that supports the W5100, W5200 and W5500