MQTT with the ENC28J60 Ethershield

My old ENC28J60 based shield surely has gathered some dust

While playing with MQTT on various ESP8266’s, I started to wonder if maybe I could do something with an old ENC28j60 shield and module I still had laying around and actually hardly ever used.

For the youngsters: The ENC28J60 Ethernetshield was the first shield to connect the Arduino with the internet. The major drawback of the chip was that it was lacking a stack, that subsequently had to be constructed in software. As a result it was kinda memory hungry. The initial version was without an SD card slot, the later version had an SD card slot. There were two libraries available: The Ethercard and the Ethershield library. The UIPEthernet library came later.
As far as I could figure out, the PubSubClient library that is needed for MQTT doesnt work with the original Ethershield/EtherCard libraries. It does work with the UIPEthernet library though (extended fork here). The UIPEthernet library is a smart piece of coding that made programs written for the W5100 Ethernetshield suitable to be used with the ENC28J60 Shield, simply by changing the included library. Ofcourse there is a price to pay for this, namely more memory consumption. There is also an MQTT client for the ENC28J60/Atmega328 based Nanode. The Ethercard seems to work with the EthercardMQTT library.

Anyway, there still is enough memory to read a DHT11 sensor an analog port and some switches. In my case those were 3 door contacts. The PubSubClient is the original from Knolleary, though normally I am more a fan of the fork by Imroy. For this example I have used the Mosquitto public broker but ofcourse any broker can be used. I have installed the Mosquitto broker on a local raspberry and I found that a call to (“raspberrypi.local”,1883) does not work, using the  local 192.168.1.xxx ip number does work though

MQTT-Output
MQTT-Output ‘Dicht’ means ‘Closed’

The program is rather ‘spartan’, to save space. Print statements have been removed or commented out after initial testing.

#include <UIPEthernet.h>
#include "PubSubClient.h"
#include "DHT.h"

#define CLIENT_ID       "UnoMQTT"
#define INTERVAL        3000 // 3 sec delay between publishing
#define DHTPIN          3
#define DHTTYPE         DHT11
bool statusKD=HIGH;//living room door
bool statusBD=HIGH;//front door
bool statusGD=HIGH;//garage door
int lichtstatus;
uint8_t mac[6] = {0x00,0x01,0x02,0x03,0x04,0x05};

EthernetClient ethClient;
PubSubClient mqttClient;
DHT dht(DHTPIN, DHTTYPE);

long previousMillis;

void setup() {
pinMode(4,INPUT_PULLUP);
pinMode(5,INPUT_PULLUP);
pinMode(6,INPUT_PULLUP);
  // setup serial communication
  //Serial.begin(9600);
  // setup ethernet communication using DHCP
  if(Ethernet.begin(mac) == 0) {
    //Serial.println(F("Ethernet configuration using DHCP failed"));
    for(;;);
  }
  // setup mqtt client
  mqttClient.setClient(ethClient);
  mqttClient.setServer("test.mosquitto.org",1883);
  //mqttClient.setServer("192.168.1.xxx",1883); //for using local broker
  //mqttClient.setServer("broker.hivemq.com",1883);
  //Serial.println(F("MQTT client configured"));

  // setup DHT sensor
  dht.begin();
  previousMillis = millis();
}

void loop() {
  statusBD=digitalRead(4);
  statusGD=digitalRead(5);
  statusKD=digitalRead(6);
  lichtstatus = analogRead(A0);
  // check interval
  if(millis() - previousMillis > INTERVAL) {
    sendData();
    previousMillis = millis();
  }
  mqttClient.loop();
}

void sendData() {
  char msgBuffer[20];
  float h=dht.readHumidity();
  float t = dht.readTemperature();
  if(mqttClient.connect(CLIENT_ID)) {
   mqttClient.publish("hal/temp", dtostrf(t, 6, 2, msgBuffer));
   mqttClient.publish("hal/humid", dtostrf(h, 6, 2, msgBuffer));
   mqttClient.publish("hal/door", (statusBD == HIGH) ? "OPEN" : "DICHT");
   mqttClient.publish("hal/garage",(statusGD == HIGH) ? "OPEN" : "DICHT");
   mqttClient.publish("hal/kamer",(statusKD == HIGH) ? "OPEN" : "DICHT");
   mqttClient.publish("hal/licht", dtostrf(lichtstatus, 4, 0, msgBuffer));
 //hal=hallway, DICHT=Closed, kamer=room, licht=light
 }
}
The old ENC28J60 shield at work

Just for completeness sake, this sketch takes about 77% of memory. This same sketch for the WIZ5100 based Ethernet shield, with the  Ethernet.h library takes about 52% of memory. If you decide to adapt the sketch, be careful with altering the character strings. For instance, using the string “OPEN” 3 times is likely less memory consuming than having 3 different strings of the same or even shorter length. Obviously the ‘topic’ strings take a lot of space as well and if you were to shorten them to less meaningful names, you could add more sensors such as for instance a PIR sensor.

Should you copy the program from this  blog page, you may copy ‘stray characters’  that you have to delete. You can also download it here.
An updated version is found here.

Freeing up memory

Should you really be pressed for memory, there is a way to free up about 5K of Flash: Go to your /../sketchfolder/libraries/UIPEthernet-master/utility/uipethernet-conf.h  and open the uipethernet-conf.h file.
in that file you will see the following section:
udp

If you set UIP_CONF_UDP to ‘0’ you will save 5kB flash, by disabling UDP. However, if you use DHCP to connect to your router, you cannot disable UDP as the DHCP connection requires UDP. In that case you still can gain a bit of memory by reducing the UIP_UDP_CONNS.
An example of using a fixed address is this:

#include <UIPEthernet.h>
byte mac[] = { 0xDE, 0xAD, 0xBE, 0xEF, 0xFE, 0xED }; 
//the IP address for the shield:
byte ip[] = { 192, 168, 1, 120 };

void setup()
{
 Ethernet.begin(mac, ip);
}
void loop() {}

A final warning… after I updated my libraries, including the Adafruit DHT library, I received an error on compiling this sketch. That disappeared when I returned it to version 1.2.1. I thought I was not using the Adafruit library but the Tillaert library, but DHT libraries come a dime a dozen so maybe my compiler linked in another than I thought.
(The main sketch is my adaptation of work I found on internet, but I think the original source is from Luca Dentella)

Sending data to Carriots IoT platform with ESP8266

carriots

Carriots.com (now called Altair Smartworks) is a flexible IoT platform that can connect to a variety of devices and can collect data in XML or JSON format. It can process that data and on the basis of that send out data, e.g. to mail or SMS and I believe it can even Tweet. Apparently it is quite popular to attach a PIR sensor that then can send you a mail if/when it detects motion

Carriots does have free accounts. Those are limited in the number of devices one can connect (only 2), the number of emails (max 100/day) and the number of SMS’ (max 5/day) but it is enough for the average hobby use.

For now, I will focus  on how to get the data into Carriots, so i will not go into detail about the inner workings  of carriots, that in fact can be a bit overwhelming for those used to ‘simple’ Thingspeak, but I think it took me about 10-15 minutes to figure it all out and set up  my account. One warning though, one of the setting screens does have some info in a non scrolling sidebar. If you have set your screen to zoom in (Ctrl +) you may not see that info unless you zoom out with Ctrl-. Therefore I advise to take the quick tour after signing up so you have some quick orientation about the various screens.
Anyway after signing up most of the work is done from the cpanel, but it comes down to “connecting” a device that then defines a datastream. Don’t be put off, once you are there, it becomes quite clear. The ESP8266 is not between the default devices so just take “Other”. Once you are done you need to go the API screen to get your API and you need to make note of your DeviceID. The latter is often said to be “streamname@userid”, but in my case it was “streamname@userid.userid”.
You need the API Key and the DeviceID to send data to Carriots.
The below code reads the Analog port of the ESP8266 and uploads that to your Carriot datastream

#include "ESP8266WiFi.h"
const char* ssid     = "YOUR_SSID";
const char* password = "YOUR_PASSWORD";
const char* server = "api.carriots.com";
// Replace with your Carriots apikey
const String APIKEY = "47777777777778c98cbb";
const String DEVICE = "xxxxx@yyy.yyy"; // your deviceID
WiFiClient client;

int val = 0;

void setup() {
  Serial.begin(115200);
  delay(1000);
  // start wifi
  Serial.println();
  Serial.print("Connecting to ");
  Serial.println(ssid);
  WiFi.begin(ssid, password);
  while (WiFi.status() != WL_CONNECTED) {
    delay(500);
    Serial.print(".");
  }

  Serial.println("");
  Serial.println("WiFi connected");
  Serial.println("IP address: ");
  Serial.println(WiFi.localIP());
}
// Send data to  Carriot

void sendStream()
{
  //const int httpPort = 80;
  if (client.connect(server, 80)) {   // If there's a successful connection
    Serial.println(F("connected"));

    // construct the data json
    String json = "{\"protocol\":\"v2\",\"device\":\"" + DEVICE + "\",\"at\":\"now\",\"data\":{\"moisture\":\"" + val + "\"}}";

    // Make an HTTP request
    client.println("POST /streams HTTP/1.1");
    client.println("Host: api.carriots.com");
    client.println("Accept: application/json");
    client.println("User-Agent: Arduino-Carriots");
    client.println("Content-Type: application/json");
    client.print("carriots.apikey: ");
    client.println(APIKEY);
    client.print("Content-Length: ");
    int thisLength = json.length();
    client.println(thisLength);
    client.println("Connection: close");
    client.println();
    client.println(json);
  }
  else {
    // If server connection failed:
    Serial.println(F("connection failed"));
  }
}
void loop() {
  val = analogRead(A0);
  Serial.println(val);
  Serial.println(F("Send Data"));
  sendStream();
  delay(30000);
}

If you copy/paste the above program into your IDE you are bound to get plenty of ‘stray /320’ error. Better to get the file here.

The JSON looks quite daunting, because it uses ‘escape codes’ the \” indicates that the quote must be seen as part of the string and not as a delimiter. So when you look at the data part of the JSON:  {\”moisture\”:\”” + val + “\”},  that is basically a sum of string, a variable and a string again, in which the strings themselves have the character ” around them. The quote that does not have an ‘escape’ sign (a \) is  simply a delimiter. If for simplicity reasons I would change the delimiters into a single quote and remove the escape codes, the JSON would look like:
{“protocol”:”v2″,”device”:” + DEVICE + “,”at”:”now”,”data”:{“moisture”:” + val + “}}

If you want to add more data to send to Carriots, it is easiest to copy the data structure in the JSON and paste it behind the old data structure, separated by a comma. So {\”moisture\”:\”” + val + “\”}, becomes
{\”moisture\”:\”” + val + “\”,\”temperature\”:\”” + val2 + “\”}

People who want to do this with an Arduino and Ethernetcard can use this library.

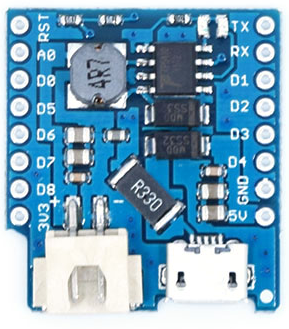
Reviewing the Wemos Battery Shield

wemosb3The Wemos battery shield seems an easy way to start battery feeding your Wemos D1 mini, but after using one for a while, it became obvious it is not for any serious battery use, mainly for two reasons: It is not efficient in using the battery power and the Wemos D1 itself is not efficient to be used with batteries.

The battery shield like all shields is to be plugged onto the Wemos D1 mini. It has two jacks: one for a battery and one for an USB plug that can be used to charge the battery. The charging circuit is built around a TP5410 Lipo charger. One therefore would expect a standard LiPo cell connector on the board but the LiPo cell connector on the board is an XH2.54 connector, whereas most LiPo cells come with a JST-PH connector. Another disappointment was that it came with male headers only. Apparently it is thought this shield should come on top of every other possible shield

Apparently he 5410 cranks up the battery voltage to 5 Volt and feeds this to the 5 Volt pin of the Wemos D1. Though this makes the Shield handy to use in combination with other shields that may rely on the voltage coming from the 5 Volt pin, it is likely a less efficient way of using the battery power as opposed to bringing it to 3.3 Volt directly via an LDO.

wemosbatteryshieldcircuitThere is not much technical information on the battery shield, but I did find a circuit that seems to almost come right out of a chinese datasheet of the TP5410, in which several configurations are shown.
Studying the circuit it seems that the 5 Volt coming from the USB, is connected to the 5 Volt pin of the shield, only through an SS32 Skottky diode. In itself that is no problem, unless one decides to use another input to that connector, e.g. a solar cell. The Wemos D1 mini has an RT9013 LDO regulator that has a max input of 5.5 Volt with an absolute Max rating of 6 Volt.
Considering that the SS32 Skottky diode has a forward voltage of 200 mV@200mA, a voltage of > 6.2 on the USB connector of the battery shield (say a 6 Volt solarpanel on a bright day) could already kill the RT9013 LDO on the Wemos D1 board, Eventhough Wemos states the shield can be supplied with 10 Volt, but maybe that is without it being connected to the Wemos D1 mini

Anyway, I hooked up a 720mAh Lipocell to the battery shield and uploades a sketch that measures the battery voltage (through a resistor on A0) and did an upload to Thingspeak every minute, being in deep sleep in between, just to see how long it would last.

My first observation was that the shield apparently does not fully charge the LiPo cell. It came to a max of 4.05 Volt before it switched to ‘Standby’. I made sure by using a Multimeter and indeed, only 4.05-4.1 volt on the cell.
shield5-6It worked pretty well after that, uploading the voltage to Thingspeak for 5 days and 5 hrs, when suddenly it stopped, with the battery voltage at 3.56 Volt, far above the 3 Volt minimum charge of a LiPo. Strange. The RT9013 has a drop of 250mV at 500mA, so even at 500mA the voltage on the ESP8266 still would have been 3.31 Volt. I have fed the 8266 with as low as 2.9 Volt and it was still working, so this was a strange finding. Resetting the Wemos did not bring it back to life… which was not so surprising because when i measured the LiPo (this was almost a day after the sketch stopped working… I was busy shopping for Newyears Eve), it was at 1.3 Volt. A quick connection to a USB port brought it back to life. A very strange finding indeed that warranted me to repeat the test (See below). But for now it doesnt seem like the battery shield is  the best solution for a serious battery dependend project.

As said before, the Wemos D1 Mini, also is not the most suitable for a battery operated project. True, the ESP8266 can be put to deepsleep and will only use around 77uA, but the Wemos board also has the CH340 FTDI to TTL chip on board. As that is directly connected to the 3.3 Volt line, it will always be active, drawing around 50uA which is sort of in the same ballparc as the ESP8266 itself. Without that CH340 it could operate 1.6 times longer.

Battery Voltage Wemos battery shield

The repeated test showed similar results: Charge to 4.05 V (should be 4.2 Volt) and apparently shuts off at 3.5 volt (should be 2.7 Volt)


batterijspaning10minA final test, in which the Wemos was put to sleep for 10 minutes, the battery lasted 18 days before it was shut off at 3.59 Volt

Apparently Harald has a more positive experience with the shield.