Simple Attiny programmer on Arduino

programmer1After I was really fed up always making the MOSI, MISO, Reset, SCK, Vcc and Ground connection with wires in order to program an Attiny85/45/13, I bought an USBASP programmer (real cheap).
Didn’t get that to work, always got the dreaded ‘Yikes, invalid device signature’ message, that is usually a sign of a bad connection. Couldn’t quickly locate it, maybe a rotten cable, but I didn’t want to lose more time so I put together a quick and simple Attiny programmer.

I know there are dozens of circuits and designs floating around on the internet, but I just never got around to actually making one, so if you are like me, this is just a little push to tell you to ‘just do it’ it takes maybe 10 minutes from scrap to programmer.

I got my inspiration from a Spanish site from a guy that inspired me to build my first Arduino, but when I checked there, the stripboard-illustrations of his programmer were gone.
No sweat, just simple to make one myself.
programmer2The idea is a little piece of stripboard that plugs in the necessary headers of the Arduino. A 20hole x 9 strips piece is enough, but I made that 22 holes, just to give a couple of small ‘wings’ to help me pull it out.
BOM
20×9 stripboard
male header 7 pins
male header 6 pins
2 LEDs
2 resistors 560-1k
1 electrolytic capacitor 10 uF (in fact I used a 33uF, that worked as well)
8 pins dil IC holder

The Arduino ISP offers 3 LEDs to keep track of status. I implemented 2: The heartbeat and the Error (D9 and D8). Adding the ‘Programming’ LED is a bit more of a hassle because that needs D7 which is just at the other side of the non standardized gap in the Arduino headers, But if you want you could add a slightly bend pin to slot into D7.
The board plugs in easily, but is not completely straight because of how the arduino headers line up, but it works great.

Just a word on the capacitor. In order to avoid that the Arduino will reset when the attiny program is uploaded, the reset pin must be kept high. there are two ways how that is usually done: a resistor (120 Ohm) to the Vcc or a capacitor (10uF) between earth and Reset. Both work well.
However, the capacitor is also the reason that you cannot upload the ArduinoISP program with the board inserted, so you have to pull it out. You could of course add a jumper to the board, or a small switch, to temporarily disconnect the capacitor

Important!!!
Make double sure and double check that you have not forgotten to make all of the necessary cuts in the stripboard. Check it after each cut, use a multimeter if necessary.
After you soldered it all up, check again that there are no stray connections or shorts. The reason for this is that you do not want to short any pins on your arduino or connect any pins to where they shouldn’t be connected. You do not want any of your Digital-Out pins to be connected to Ground when you pull them high.

Anyway, build it yesterday and works great. I have programmed more Attiny’s in half a day than I did in my life before.

For people that are new to programming an Attiny: The steps are as follows.
Make sure you have an Attiny core installed (There are many, try here or here , you also may want to check here)
Remove the programming board and upload the ‘ArduinoISP’ program to your Arduino.
Insert the program board and load the desired Attiny sketch.
Choose the proper Attiny setting under ‘Tools-Board’
Go to ‘File-Upload Using Programmer’ in older IDE-versions this might be just ‘Upload’
You may want to check here or here for more information on the programming.
important is to know that even with a succesful programming, you will get two error messages:
“avrdude: please define PAGEL and BS2 signals in the configuration file for part ATtiny85”.
just ignore those messages.
If you are perfectionist, you can solve those error messages by edit file avrdude.conf, found in

programmer4programmer3(windows) C:\Program Files (x86)\arduino-1.0.6\hardware\tools\avr\etc
(Ubuntu) Home\Arduino-1.06\hardware\tools
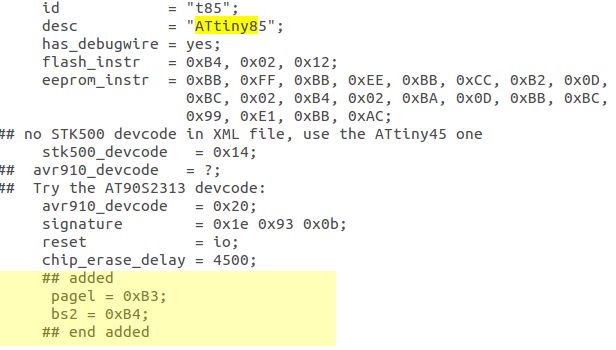
Find the word Attiny85 and go down a few lines up to:

chip_erase_delay = 4500;
and add below these lines:
# Added to eliminate the bug to build.
pagel = 0xB3;
bs2 = 0xB4;
Find this section lower down and add the highlighted code:
memory “lock”
size = 1;
write = “1 0 1 0 1 1 0 0 1 1 1 x x x x x”,”x x x x x x x x 1 1 i i i i i i”;
read = “0 1 0 1 1 0 0 0 0 0 0 0 0 0 0 0″,”0 0 0 0 0 0 0 0 o o o o o o o o”;
min_write_delay = 9000;
max_write_delay = 9000;
;
Thanks baelza.bubba for putting me on track for that. If you have trouble understanding, check the two pictures. Understand that you dont HAVE to alter the file, it will all work. The alteration is just to get rid of the error messages.

Just a tip: when I was programming Attiny’s I used the setting for the 8MHz internal clock and found my timings to be far off. coincidence or not, it seemed they were a factor 8 off (slower). When I tried at 1 MHz, It all seemed OK again. This is caused by the following: The standard operating speed for the Attiny is 1Mhz, and it gets that by dividing the internal oscillator by 8. Where I presumed the 8MHz setting would set the proper fuses to tell the Attiny it shouldnt divide the internal oscillator anymore, it seems that it may not do that. The solution would be to first set the proper fuses by selecting ‘burn bootloader’ That doesnt burn the bootloader, but it does set the right fuses.

Just another tip: There are various Attiny cores and not all are full implementations. If you intend to use the ‘OneWire’ library, you may run into errors like :

/libraries/OneWire/OneWire.cpp:105: error: ‘digitalPinToBitMask’ was not declared in this scope
/libraries/OneWire/OneWire.cpp:106: error: ‘digitalPinToPort’ was not declared in this scope
/libraries/OneWire/OneWire.cpp:106: error: ‘portInputRegister’ was not declared in this scope

There is an easy fix for that:

• Locate and open OneWire.h
• Locate this section of code towards the top…

#if ARDUINO >= 100
#include “Arduino.h” // for delayMicroseconds, digitalPinToBitMask, etc
#else #include “WProgram.h” // for delayMicroseconds
#include “pins_arduino.h” // for digitalPinToBitMask, etc
#endif

• Change into:

#if ARDUINO >= 100
#include “Arduino.h” // for delayMicroseconds, digitalPinToBitMask, etc
#include “pins_arduino.h” // for digitalPinToBitMask, etc
#else #include “WProgram.h” // for delayMicroseconds
#include “pins_arduino.h” // for digitalPinToBitMask, etc
#endif

• Save and close OneWire.h

• No need to restart the Arduino IDE
The problem is not with the library but with the core. It is just easier to fix in the library

And yet another tip: If you are trying to use the Attiny with the LCD library from F. Malpertida, you may run in some error messages that have to do with the print.h and print.cpp files of the core.
These can be fixed. There are two publications on how to do that, but most likely, using the proper core will solve that without having to change anything.   Useful info also here.

Sending wireless data from one Attiny85 to another

schema-manchesterI have struggled a lot with sending RF data between two Attiny85 chips, so I thought it might be helpful if I just explain how I did it. There are a number of such projects being described on the internet, but yet, it didn’t prove to be such a straightforward project, which i found to be mostly due to not using the right libraries and cores.

BOM
Transmitter:
Attiny85 – 0.82 euro/10
10k resistor
433 MHz transmittermodule – 1 euro per set
mini breadboard – 58 cts/piece

Receiver:
Attiny85
10k resistor
433 MHz Receiver module
mini breadboard
Optional: 2 wire LCD

There are two main libraries used to send and receive data on an Arduino platform: VirtualWire and Manchester code.
As Virtualwire is a bit older, no longer supported, and supposedly can only send characters (though there is a way around that) I decided to use Manchester code.

To make a long story short, it didn’t work. I had the MANCHESTER.h and MANCHESTER.cpp file and ran into a lot of trouble, until I discovered that was the wrong/old library, you need the Manchester.h and Manchester.cpp file from here. When I used that I got my transmitter to work, I could send data to an Arduino, that was already a big relief.

However……. whatever I did, I did not get my receiver to work. In testing something on an Attiny it is very frustrating to just stare at an LED that is supposed to light, but doesnt, without knowing what and why and how.
So i decided to add an LCD to the Attiny, so at least I could see what was happening..
However, the LCD on my attiny gave me other problems… and when I solved those, that proved to be the solution for my receive problem as well: I was using the wrong core. I was using the ‘tiny core’ rather than the ‘attiny core’
The latter is the one from Highlowtech.
NOTE: it is generally accepted that the ‘tiny core‘ works with the Manchester code and the attiny core does not, so it is possible that I mixed up the two. However, I had a line added to the Attiny core that I forgot about that will make it work with the Manchester code. Open up  the “variants/tiny8/pins_arduino.h” file and add the line”#define __AVR_Attinyx5__”

attiny_manchester

The build of the transmitter is easy:
send-manchester-breadboard
Plug the attiny chip into your breadboard,
Connect a 433 MHz Transmitter module with its data in to pin PB0 (that is pin 5 on the chip).
Connect Vcc and Ground of the transmitter module to Vcc (pin 8) and ground (pin 4) of the Attiny
Insert a 10 k resistor between pin 1 (Reset) and pin 8 (Vcc)
Connect Vcc and ground to 5 Volt
Take a 17 cm stiff wire and attach that to the antenna hole of the transmitter.
use the following program:

#include <Manchester.h>
/*
  Manchester Transmitter example
  In this example transmitter will send one 16 bit number
  per transmission.
  Try different speeds using these constants, your maximum
  possible speed will depend on various factors like transmitter 
  type, distance, microcontroller speed, ...
  MAN_300 0
  MAN_600 1
  MAN_1200 2
  MAN_2400 3
  MAN_4800 4
  MAN_9600 5
  MAN_19200 6
  MAN_38400 7
*/
  #define TX_PIN 0  //pin where your transmitter is connected
  uint16_t transmit_data = 2761;
  void setup() {
  man.setupTransmit(TX_PIN, MAN_1200);
} 
void loop() {
  man.transmit(transmit_data);
  delay(200);
}

Just a word on the 2716 that I am sending. The program is not mine, I found it as such and since it worked and I was very happy to see the ‘2716’ appear in my Arduino after days of fruitless trying, I decided to leave it there as a tribute. (it might have found it here)

Building the receiver is easy:
receive-manchester-breadboardPut the programmed attiny chip in your breadboard.
Connect a 10 k resistor between pin 1 and pin 8
Put your 433 MHz Receiver module in the breadboard
Connect the datapin (usually either one of the two middle pins) to pin PB1 (physical pin6) on the attiny.
Connect the Vcc and Ground of the transmitter module to Vcc (pin 8) and Ground (pin4) of the Attiny
Connect the LCD interface to pin PB0 (pin 5) (Clock) and pin PB2 (pin 7) (Data/Enable)
Connect Vcc and ground of the LCD to Vcc and Ground.
Attach a 17 cm (1/4 lambda for 433 MHz) to the Receiver module.
Use the following program in your chip:

#include <Manchester.h>
#include <LiquidCrystal_SR.h>
LiquidCrystal_SR lcd(0,2,TWO_WIRE);
/*
  Manchester Receiver for Attiny
  In this example receiver will receive one 16 bit number per
  transmittion to switch a relay on or off. 
  try different speeds using these constants, your maximum possible
  speed will depend on various factors like transmitter type, 
  distance,  microcontroller speed, ...

  MAN_300 0
  MAN_600 1
  MAN_1200 2
  MAN_2400 3
  MAN_4800 4
  MAN_9600 5
  MAN_19200 6
  MAN_38400 7
*/
#define RX_PIN 1 //= pin 6
uint8_t moo = 1;
void setup()
{
lcd.begin(16,2);
lcd.home();
lcd.print("Receive");
lcd.setCursor(0,1);
  man.setupReceive(RX_PIN, MAN_1200);
  man.beginReceive();
}
void loop() {
  if (man.receiveComplete()) {
    uint16_t m = man.getMessage();
    man.beginReceive(); //start listening for next message right
                        //after you retrieve the message
   moo = ++moo % 2;
    lcd.print(m);
  }
}

The LCD is ofcourse optional. You can use an LED that gets the variable ‘moo’ send to its pin and thus will flash on complete receival of the signal, but I just wanted to make sure that what I got was what I sent

lcd-manchesterThe results are good, no garbage is being received, but the reach is about 4-5 meters, with the antennas. The antenna on the receiver only makes a small difference. The one on the Transmitter makes a big difference.
Still, this is surprising as the transmitter module is capable of switching remote switches at greater distances even on different floors.

With regard to the length of the Antennas:

as f * λ= c (frequency * wavelength = lightspeed)
λ=c/f
λ= 299,792,458 /433,920,000
The wavelength is 0.690893386 meters.
Antenna would be λ/4= 0.172723346 meters (17.3 cm)
That is about 6.80013 inches.
If you would be using 315 MHz modules, the antenna would be: 0.238 m or 23.8 cm

You can also use the wavelength calculator.
Supposedly the transmitter module can take 12 Volts and still be steered by a 5 Volt microcontroller pin and will have a further reach then. Increasing the voltage on the receiver of course makes no difference

Once you have established The link between two attiny’s, linking one of them with an arduino should not be a problem. I use mine to send data to an Arduino ( e,g. temperature, or the status of a tripwire), or to receive data from an Arduino to steer a servo or an RGB LED.

If you want to trigger a relay, you would do it like this:

void loop() {
  if (man.receiveComplete()) {
    uint16_t m = man.getMessage();
    man.beginReceive(); //start listening for next message 
                        //right after you retrieve the message
    moo = ++moo % 2;
    lcd.print(m);
    if (m==2761){digitalWrite(Relay,HIGH);}
    if (m==0000){digitalWrite(Relay,LOW);}
  }

Ofcourse you need to define the Relay pin in the ‘setup’

Two wire interface for LCD with shift register on Attiny85

In an earlier article “Two wire interface for LCD with shift register“, I discussed  how to make a two wire interface for an LCD and use that on the Arduino.
Obviously if there is any chip  in the AVR arsenal that would benefit from only having two wires necessary for  an LCD, it is the Attiny (85/45/25). It is very well possible to use this interface with an Attiny as well.
As in the linked article I use the LCD interface from F. Malpartida and I use the following program:

#include <LiquidCrystal_SR.h>

LiquidCrystal_SR lcd(0,2,TWO_WIRE);
//                   | |
//                   | \-- Clock Pin
//                   \---- Data/Enable Pin

void setup(){
  
  lcd.begin(16,2);               // initialize the lcd
  lcd.home ();                   // go home
  lcd.print("LCD with 2 wires");
  lcd.setCursor ( 0, 1 ); // go to position
  lcd.print("on Attiny85");
}

void loop(){
}

There are various cores available for the Attiny85 and I have tried a couple. Some will not work with this (a hoist of errors regarding the ‘print.h’ file), but the Attiny core from David Mellis works for me.

IMG_20150316_210709 IMG_20150316_210943 IMG_20150318_091311

Note
I found out that I had some trouble using the I2C port on an Attiny85 if I also used this 2 wire LCD, I am not sure yet where the problem is, maybe some shared timers or maybe  the HC164 needs serious decoupling. Anyway, if you are using I2C on an Attiny, you might as well use an I2C LCD as well.

QH-832AC Door-bell modding

In a search for a cheap 433 MHz wireless doorbell I came upon the Quhwa QH-832AC aka QH-C-CE-3V, aka SelectPlus, aka. 1 by One in a local thrift shop (“Action”). It exists in Black and in White.
I wanted my Arduino to be able to receive the signal from the push-button so it could undertake any action necessary when someone would ring the bell (such as switch on a light, release the hounds or whatever).
My usual approach with a new 433 MHz RF device is that I use some kind of sniffer program in my Arduino and try to gather raw data from the transmitter. My standard programs didn’t really work and another program I found gave me some data that I couldn’t really work with, so i was at a loss there.
Searching internet brought me to much interesting info about the SelectPlus, but one site gave me some useful information: Voyager describes a plug-in he wrote for the Nodo and also this site gives valuable information..
I now knew it was a 36 pulse code, possibly with a pre-amble and probably repeated a couple of time. A friend with an analyzer helped me out.
The version I have is the White one with a datecode of 914. If I consider a  short puls (250-275u sec) as a ‘1’ and a long pulse (950-1000 u sec) as a ‘0’, then the pulse train is:
10101100101011001011001101010101010. That is the ‘RAW’ code. As I only had 35 pulses with the first one  actually a bit longer than a ‘short’ and a bit shorter than a ‘long’, that might have been just a preamble.
Converting the code to bits went as follows:

1 01 01 10 01 01 01 10 01 01 10 01 10 10 10 10 10 10
? 1 1 0 1 1 1 0 1 1 0 1 0 0 0 0 0 0

I presumed the first ‘1’ to be a preamble of some sort, or it could in fact be a ’01’.
Anyway the binary code converted to hex is as follows 11011101101000000  => 1BB40. However, if I presume that first preamble to be a ’01’ the address is 3BB40
When I did the same exercise for the black button that gave 11100001100110000  => 1C330 or 111100001100110000=3C330
It seems that the first 13 (14) bits are a unique bell identifier and the last 4 bytes have no specific meaning.

As I find making a send program a little bit easier than a receive program, I  first  focussed on that. These send programs are in fact not so difficult: they  go through the  specific code bit by bit and then send that with the specific pulse width.
When I would use the code 1BB40 and use that to program the doorbell (“Program” meaning unplug the chime and replug it an then send the code), I could get it to work from my Arduino, but it would not respond to the bell button. If I would programit with the bell button it would only sometimes respond to the arduino code.
If I used the 3BB40 code, it would work both ways

const byte rfPin=7;

void setup()
{
SelectPlus(0x3BB40);// White
//SelectPlus(0x3C330);// Black
}

void loop()
{
//SelectPlus_Send(0x3BB40);// 11 1011 1011 0100 0000
}
    
void SelectPlus(uint32_t address) {
    int pulseWidth= 325;// Pulse width in uS
    byte repeat = 16;   //  repeat send   
    uint32_t databit;
    uint32_t mask = 0x10000; //0x20000;
    uint32_t sendbuff;


    for (byte j = 0; j <= repeat; j++) {
        sendbuff=address;  
        // send 3 HIGH pulses for syncing
        digitalWrite(rfPin, HIGH);
        delayMicroseconds(pulseWidth * 3);
        
        // Send command
        for (int i = 0; i < 18;i++) {  // 18bits

        databit = sendbuff & mask;
// databit=11 1011 1011 0100 0000 & 0x20000
// databit=11 1011 1011 0100 0000 & 10 0000 0000 0000 0000 
// databit=10 0000 0000 0000 0000
sendbuff = (sendbuff << 1);// Shift left 
// sendbuff=   11 1011 1011 0100 0000 <<1
// sendbuff=(1)11 0111 0110 1000 0000
if (databit != mask) // it is at the 4th cycle of the loop
{ // Write 0 
digitalWrite(rfPin, LOW); 
delayMicroseconds(pulseWidth); 
digitalWrite(rfPin, HIGH); 
delayMicroseconds(pulseWidth * 3); 
} 
else 
{ // Write 1 
digitalWrite(rfPin, LOW); 
delayMicroseconds(pulseWidth * 3); 
digitalWrite(rfPin, HIGH); 
delayMicroseconds(pulseWidth); 
} 
} 
digitalWrite(rfPin, LOW); 
delayMicroseconds(pulseWidth * 16); 
} 
} 
/*
           ___
'0':     _|   |   (T,3T)
             _ 
'1':     ___| |    (3T,T) 
*/

Normally this chime will reset itself if unplugged from the mains. After replugging it just waits for the first bel signal to tune into that. I discovered however that if I had the chime programmed for the White code, but I would send the black code some 3-4 times without  replugging it, it would react to the black code and not to the white code, though strangely it still would react to the white button. If I then would send the white code a couple if times it would pick up on that code again and not seldom it would stick, meaning it would react to both the black AND the white code. Obviously this chime still holds a couple of mysteries in its code that I haven’t discovered yet
As I didn’t feel like figuring out yet how my Arduino could receive the code from the wireless button, I decided to do some hardware modification for fun:
On the PCB there are two LEDs printed on the silkscreen. These LEDs seem to be in parallel, so it is sufficient to solder in only one. A small hole in the  cover for it to stick through and voila, an optical signal added. Handy for deaf people
led-bell