Recently I found an LCD module somewhere in one of my many boxes with things. As I had probably bought it over 20 years ago, but never used, I wasn’t quite sure anymore what the pin lay-out was.

Generally all these LCD modules, including this one, are based on the HD44780 chip. One could follow the lines of the SMD chip on the right of this picture and determine which pin of the connector, hooked up to which pin of the chip. Not too difficult with a small magnifying glass, but it seemed some of these tracks are under the chip, so that would be a small problem.
Now wouldn’t there be some general connection scheme? Well, yes, but there is a problem with that. There are basically two different lay-outs:

Most of the connections between different modules are the same, but not always:
| Pin |
Seiko M1632 |
Densitron LM22 |
| 1 |
D7 |
D7 |
| 2 |
D6 |
D6 |
| 3 |
D5 |
D5 |
| 4 |
D4 |
D4 |
| 5 |
D3 |
D3 |
| 6 |
D2 |
D2 |
| 7 |
D1 |
D1 |
| 8 |
D0 |
D0 |
| 9 |
E |
E |
| 10 |
R/W |
R/W |
| 11 |
RS |
RS |
| 12 |
Vlc |
Vlc |
| 13 |
Vss=Gnd |
Vdd=Vcc |
| 14 |
Vdd=Vcc |
Vss=Gnd |
As you can see, these two types differ on a very essential point: the connection for the power supply/ You do not want to mess with that. To make things even more complicated. The ‘official’ pin numbering for the Densitron is also the other way around, so what I labelled as ‘14’ is actually pin ‘1’ but for clearity’s sake I ‘normalized that in this comparison.
Also, just from looking at the LCD module you do not know what is the top or the bottom and therefore you also do not know if your connector is at the left or the right and thus you do not know what the pin numbering is to begin with, although fortunately in my case, they were numbered.
Add to that that in my LCD module some tracks were under the chip. I was going to need the datasheet of the chip:

Compare that to my module:

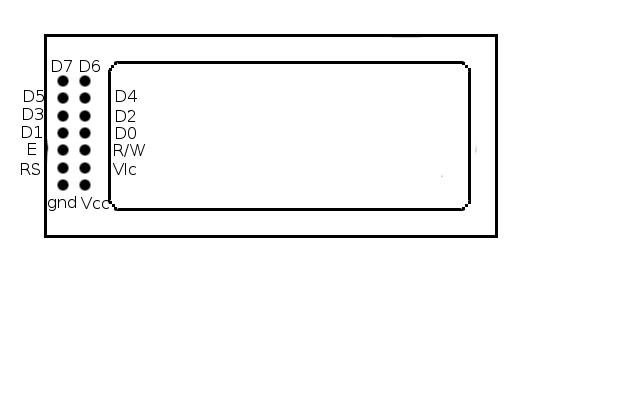
and many of the tracks can already be followed by the bare eye. It is easy to see that DB1 connects to the 4th pin on the right (which is pin 7, remember, you are looking at the back) DB0 connects to the 4th pin on the left (which is pin 8), etcetera etcetera. That all lines up with the table above. Unfortunately, the doubtful pins, the power supply pins, that should connect to the bottom 2 pins are obscure as they disappear under the chip. So, out comes the multimeter. I figured that pin 13 was the ground coz it’s track goes below the track of pin 14, which makes it very likely to connect to the Ground pin, whereas pin 14 (if the board was designed intelligently) was much more suitable to connect to Vcc. As I hate putting multimeters on SMD pins (my eyes are not that good anymore) and it seemed the metal shield of the display was also attached to a copper track on the board, I measured between pin 13 and the metal shield/casing. Bingo! connected. With that I am pretty convinced that this module follows the SEIKO M1632 lay-out and as a matter of fact, when looking for a picture of the SEIKO M1632 on the internet, it seemed quite similar to my module. In hindsight, the identification M1632 was even printed on the board, but almost invisible under another print: 7Y24127005
You may find datasheets og the M1632 that give another layout of the pins. However, the following worked for me:
Now the only problem I have is that I wanted to connect it directly to a ‘Ladyada’ like ‘backpack’, but that is going to be difficult with this pin layout and I dont want to use a cable, just straight headers. Oh well, I guess I have to construct something myself then with a 595 chip.
More on these LCD’s
If you ever need to repair one, this may come in handy.
M1632 Datasheet


